深度学习(神经网络)之所以具备智能,就是因为它具有反馈机制。深度学习具有一套对输出所做的评价函数(损失函数),损失函数在对神经网络做出评价后,会通过某种方式(梯度下降法)更新网络的组成参数,以期望系统得到更好的输出数据。

由此可见,神经网络的系统主要由以下几个方面组成:
- 输入
- 系统本身(神经网络结构),以及涉及到系统本身构建的问题:如网络构建方式、网络执行方式、变量维护、模型存储和恢复等等问题
- 损失函数
- 反馈方式:训练方式
定义好以上的组成部分,我们就可以用流程化的方式将其组合起来,让系统对输入进行学习,调整参数。因为该系统的反馈机制,所以,组成的方式肯定需要循环。
而对于Tensorflow来说,其设计理念肯定离不开神经网络本身。所以,学习Tensorflow之前,对神经网络有一个整体、深刻的理解也是必须的。如下图:Tensorflow的执行示意。

那么对于以上所列的几点,什么才是最重要的呢?我想肯定是有关系统本身所涉及到的问题。即如何构建、执行一个神经网络? 在Tensorflow中,用计算图来构建网络,用会话来具体执行网络。深入理解了这两点,我想,对于Tensorflow的设计思路,以及运行机制,也就略知一二了。
- 图(tf.Graph):计算图,主要用于构建网络,本身不进行任何实际的计算。计算图的设计启发是高等数学里面的链式求导法则的图。可以将计算图理解为是一个计算模板或者计划书。
- 会话(tf.session):会话,主要用于执行网络。所有关于神经网络的计算都在这里进行,它执行的依据是计算图或者计算图的一部分,同时,会话也会负责分配计算资源和变量存放,以及维护执行过程中的变量。
另外,我们需要对tensorflow内部API有一个整体了解,tensorflow API 结构一览:
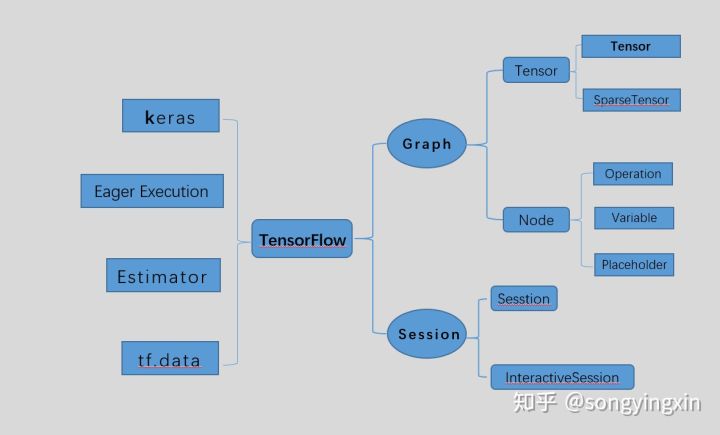
在上图中, 左边的部分是高层API, 高层API在牺牲部分灵活性的情况下可以帮助你快速的搭建模型; 右边的部分属于底层API, 灵活性较高,但模型的实现较为复杂,一个简单模型往往需要上千行代码。
接下来,我们主要从计算图开始,看一看Tensorflow是如何构建、执行网络的。
数据流图
tensorflow 定义的数据流图如下所示:
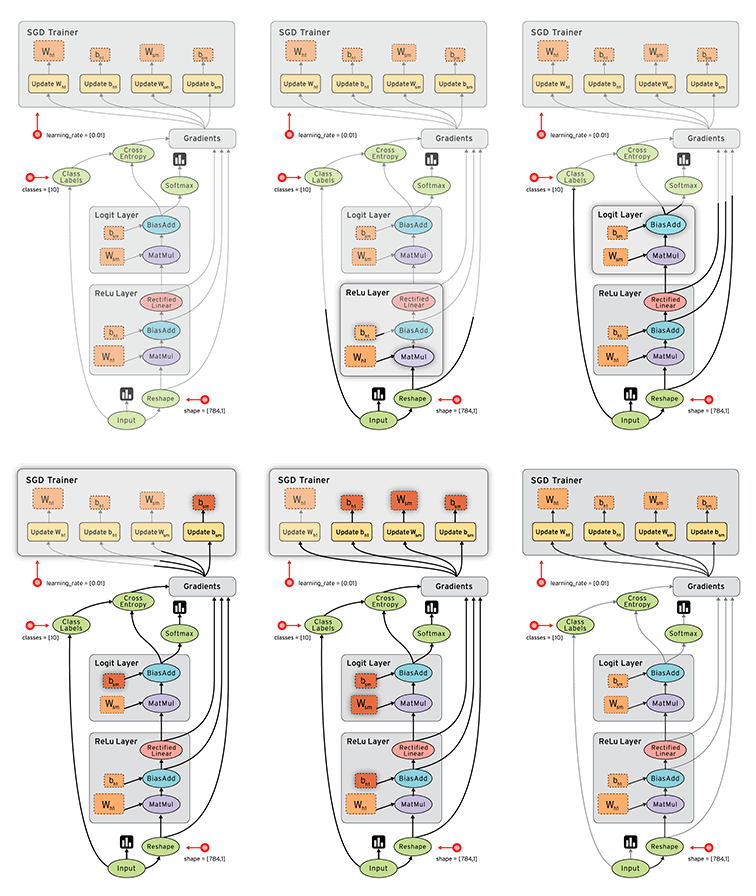
从上面可以看出,tensorflow的Graph明确定义为:由节点和有向边描述数学运算的有向无环图。例如
- 调用
tf.constant(42.0)可创建单个tf.Operation,该操作可以生成值 42.0,将该值添加到默认图中,并返回表示常量值的tf.Tensor。 - 调用
tf.matmul(x, y)可创建单个tf.Operation,该操作会将tf.Tensor对象 x 和 y 的值相乘,将其添加到默认图中,并返回表示乘法运算结果的tf.Tensor。 - 执行
v = tf.Variable(0)可向图添加一个tf.Operation,该操作可以存储一个可写入的张量值,该值在多个tf.Session.run调用之间保持恒定。tf.Variable对象会封装此操作,并可以像张量一样使用,即读取已存储值的当前值。tf.Variable对象也具有assign和assign_add等方法,这些方法可创建tf.Operation对象,这些对象在执行时将更新已存储的值。(请参阅变量了解关于变量的更多信息。) - 调用
tf.train.Optimizer.minimize可将操作和张量添加到计算梯度的默认图中,并返回一个tf.Operation,该操作在运行时会将这些梯度应用到一组变量上。
前向图中的节点分为三类:
- Operation,主要为数学函数和表达式。比如图中的MatMul,BiasAdd和Softmax,绝大多数节点都属于此类。
- 存储模型参数的张量(Variable):比如图中的$W_{h1}$和$b$。
- 占位符(placeholder):比如图中的Input和Class Labels,通常用来描述输入、输出数据的类型和形状。
后向图中的节点同样分为三类
- 梯度值:经过前向图计算出的模型参数的梯度,比如图中的
Gradients - 更新模型参数的操作:比如图中$Update W$和$Update b$,它们定义了如何将梯度值更新到对应的模型参数。
- 更新后的模型参数,比如图中
SGD Trainer内的W和b,与前向图中的模型参数一一对应,但参数值得到了更新,用于模型的下一轮训练。
有向边:定义了节点之间的关系。分为两类:一类用于传输数据,绝大部分流动着张量的边都是此类,在图中使用实线表示,简称数据边。还有一种特殊边,一般画为虚线边,称为控制依赖,可以用于控制操作的运算,这被用来确保happens-before关系,这类边上没有数据流过,但源节点必须在目的节点开始执行前完成执行。例如tf.global_variables_initializer()形成的边。
模型载体:操作(节点)
数据流图中的节点按照功能的不同可以分为下面三种:
- 计算节点(Operation):对应的是无状态的计算或控制操作,主要负责算法逻辑表达或流程控制
- 存储节点(Variable):对应的是有状态的变量操作,通常用来存储模型参数
- 数据节点(Placeholder):对应的是特殊的占位符操作,用来描述待输入数据的属性
对于无状态节点,其输出由输入张量和节点操作共同确定,没有内部状态,不长期保存任何值。对于有状态节点,如存储节点,其输出还受到节点内部保存的状态值影响。
节点之间连接的边流动着的是张量。对于计算节点,Operation绝大部分的输入,输出都为张量。对于tf.global_variables_initializer()这种类型为NoOp(无输入输出)的除外。对于存储节点,需要使用tensor进行初始化,输出是变量,但是可以像张量那样使用。Just like any Tensor, variables created with Variable() can be used as inputs for other Ops in the graph。对于数据节点,可以在session.run()的时候使用numpy进行初始化,但是输出仍然是张量。
先看几个函数定义
1 | tf.constant(value, dtype=None, shape=None, name='Const', verify_shape=False) # 一种Operation |
由上面的定义可以看出,tensorflow中所有的节点都有name的参数,用于指定该节点的名字,从节点得到的tensor也跟该节点名称相关。tensor的名字全局唯一。
计算节点:Operation类
tensorflow是一个符号式编程的框架,首先要定义一个graph,然后用一个session来运行这个graph得到结果。graph就是由一系列Op构成的。上面的tf.constant(),tf.add(),tf.mul()都是op,执行这些函数的时候,tensorflow内部会自动构造相应的Operation实例。凡是Op,都需要通过session运行之后,才能得到结果。Operation的输入,输出都为张量。但是NoOp除外
属性
- name:Operation在数据流图中的名称
- type:Operation的类型名称
- inputs:输入张量列表
- control_inputs:输入控制依赖列表
- outputs:输出张量列表
- device:操作执行时使用的设备
- graph:Operation所属的数据流图
- traceback:Operation实例化时的调用栈
constant
constant是一种Op,下面对constant在graph中的结点表示进行说明。
1 | import tensorflow as tf |
在执行完var = tf.constant([1, 2, 3, 4, 5, 6, 7])后,图中生成了以下结点:
- Const:用来保存var常量;
在执行完tf.global_variables_initializer()后,图中结点为:
- Const
- init
下面我只展示,dump_graph(g, 'after_initializer_run.graph')的输出。
由输出可以看到,我们可以看到关于常量的类型,形状、具体的值都已经在一个node中包含了。虽然函数global_variables_initializer()的执行在图中添加了一个init的结点,但是没有任何操作。可见,常量在会话中是不需要进行所谓初始化的。
1 | node { |
存储节点:Variables
变量也就是参数,例如CNN中的权重、卷积核、偏置等,当训练网络的时候,变量会自动更新。
很多人会以为tf.Variable()也是op,其实不是的。tensorflow里,首字母大写的类,首字母小写的才是op。tf.Variable()就是一个类,不过它包含了各种op,比如你定义了x = tf.Variable([2, 3], name = 'vector'),那么x就具有如下op:
1 | x.initializer # 对x做初始化,即赋值为初始值[2, 3] |
tf.Variable()必须先初始化,再做运算,否则会报错。下面的写法就不是很安全,容易导致错误:
1 | W = tf.Variable(tf.truncated_normal([700, 10])) |
要把W赋值给U,必须现把W初始化。但很多人往往忘记初始化,从而出错。保险起见,应该按照下面这样写:
1 | W = tf.Variable(tf.truncated_normal([700, 10])) |
变量属性
- name:变量在数据流图中的名称
- dtype:变量的数据类型
- shape:变量的形状
- initial_value:变量的初始值
- initializer:计算前为变量赋值的初始化操作
- device:存储变量的设备
- graph:变量所属的数据流图
- op:变量操作
这里有两种方法建立变量。下面分别进行介绍。
tf.Variable()
tf.Variable()类的初始化函数参数
1 | initial_value=None, trainable=True, collections=None, validate_shape=True, caching_device=None, name=None, variable_def=None, dtype=None, expected_shape=None, import_scope=None, constraint=None |
其中,trainable参数为False的时候,不训练该参数。而其中的name为可选项。
tensorflow中随机数生成函数主要有:
- tf.random_normal: 从正态分布中输出随机值
- tf.random_uniform: 从均匀分布中返回随机值
- tf.truncated_normal: 截断的正态分布函数。生成的值遵循一个正态分布,但不会大于平均值2个标准差。
- tf.random_shuffle: 沿着要被洗牌的张量的第一个维度,随机打乱。
initial_value参数可以嵌套使用tensorflow的随机数生成函数。
例如
1 | import tensorflow as tf |
可以使用相同的name定义不同的变量,tensorflow会自动检测,若变量名相同,会被重命名。
1 | var is named as "Variable", var1 is named as "Variable_1",var2 is named as "foo",var3 is named as "foo_1" in Tensorflow. |
tf.get_variable()
1 | tf.get_variable( |
在tf.Variable()中,name参数为可选项,而在tf.get_variable()中,name函数为必填项,因为tf.get_variable()根据这个名字创建或者获取变量,避免无意识的变量复用而造成的错误。
initializer几个常用函数如下:
- tf.constant_initializer():初始化为常数,这个非常有用,通常偏置项就是用它初始化的。
- tf.truncated_normal_initializer():生成截断正态分布的随机数
- tf.random_normal_initializer():生成标准正态分布的随机数
- tf.RandomUniform():生成均匀分布的随机数
例如:
1 | import tensorflow as tf |
tf.name_scope()和tf.variable_scope()
首先,看一下tf.variable_scope()的定义
1 | tf.variable_scope(name_or_scope,default_name=None,values=None,initializer=None,regularizer=None,caching_device=None,partitioner=None,custom_getter=None,reuse=None,dtype=None) |
将参数设置reuse=True,这样tf.get_variable()就可以直接获取已经声明的变量(而且只能获得已经声明的变量,若变量未声明,则不会产生变量,进而报错)。而reuse=False,则tf.get_variable()将创建新的变量,若name属性相同的变量已经存在,会报错。对于嵌套的tf.variable_scope(),若不指定reuse参数,则默认与外面最近的一层保持一致。
对于tf.name_scope()定义为
1 | tf.name_scope( |
可以看出来,tf.name_scope()没有reuse参数,而且这个函数主要使用tensorboard可视化计算图的时候
tf.get_variable() is a high level version oftf.Varible().区别主要为:
在scope中,tf.name_scope()不会影响到tf.get_variable(),tf.variable_scope()会影响到所有Op和变量。
例如:
1 | import tensorflow as tf |
We define a function named scoping() and input different paramaters to see output:
1 | scope_vars |
另外,关于两者的区别
- We should use tf.get_variable()(but not tf.Variable()) to create variables that we reuse in next lines.
- If we create a variable by tf.variable(),we can not reuse it by tf.get_variable().
- We should usetf.variable_scope() to manage variables that we reuse in next lines.
???值得注意的是,使用tf.get_variable()的时候,trainable的属性也是可以继承的,比如说:
1 | import tensorflow as tf |
则tf.trainable_variables()为空。
Variables在图中的结构
作为存储节点的变量不是一个简单的节点,而是一幅由多个子节点组成的子图。例如:
1 | import tensorflow as tf |
在执行完tf.Variable(2)以后,图中生成了以下几个结点:
- Variable/initial_value(变量初始值):the stateful TensorFlow op that owns the memory for the variable. Every time you run that op, it emits the buffer(as a “ref tensor”) so that other ops can read or write it.
- Variable/Assign(更新变量值的操作): the initializer operation that writes the initial value into the variable’s memory. It is typically run once, when you do sess.run(tf.global_variables_initializer()) in your program.
- Variable/read(读取变量值的操作):an operation that “dereferences” the Variable op’s “ref tensor” output.
- Variable/(变量操作):the tensor that you provided as the initial_value argument of the tf.Variable constructor.
在上述节点中,前三种节点对应的是无状态操作,而变量操作节点对应的是有状态操作。在tensorboard中,在渲染数据流图时,为有状态操作添加了一对括号。
1 | after_initializer_creation.graph |
接着执行完tf.global_variables_initializer()后,图中结点变为:
- Variable/initial_value
- Variable
- Variable/Assign
- Variable/read
- init : 图中变量初始化的作用
1 | after_initializer_run.graph |
注意after_initializer_run与after_initializer_creation输出是一样的。也就是说,执行到init = tf.global_variables_initializer()的时候,图的结构已经固定了。但是如果要使用变量,必须放到回话中,执行sess.run(init)。此时,inti节点会将init_value传入Assign子节点。否则数据没有流动起来。
打印所有需要训练的变量
一般来说,打印tensorflow变量的函数有两个:tf.trainable_variables () 和 tf.all_variables()
不同的是:tf.trainable_variables () 指的是需要训练的变量。tf.all_variables() 指的是所有变量
一般而言,我们更关注需要训练的训练变量:
值得注意的是,在输出变量名时,要对整个graph进行初始化
打印需要训练的变量名称
1 | variable_names = [v.name for v in tf.trainable_variables()] |
打印需要训练的变量名称和变量值
1 | variable_names = [v.name for v in tf.trainable_variables()] |
这里提供一个函数,打印变量名称,shape及其变量数目
1 | def print_num_of_total_parameters(output_detail=False, output_to_logging=False): |
变量按照下标索引更新
1 | import tensorflow as tf |
输出:
1 | [[0 0 0 0] |
同样的,若想只更新某些维度
1 | import tensorflow as tf |
运行结果
1 | [[0 0 0 0] |
变量操作
在上面我们已经介绍了变量由四个子节点组成,那么变量操作子节点和变量有啥区别呢,这里做个简单的介绍。
变量操作是TensorFlow中一类有状态操作,用于存储变量的值。变量操作对应的操作函数是tensorflow/python/ops/state_ops.py文件中定义的variable_op_v2。构造变量操作的时候,需要给定其存储变量的形状与数据类型。每个变量对应的变量操作对象在变量初始化时构造。
例如
1 | a = tf.Variable(1.0, name = 'a') |
在tensorboard中变量操作节点的名字为Variable/(a),实际上这里的(a)节点是变量 a 的私有成员 _variable,即变量 a的变量操作。(a)节点内部存储变量a的值,当用户想要读取或更改a的值时,均需要经过read或Assign节点。
其中,Assign为为更改变量的节点。由此可得tf.assign(ref, value, validate_shape = None, use_locking = None, name = None)通过将 “value” 赋给 “ref” 来更新 “ref”。
- ref:一个可变的张量.应该来自变量节点.节点可能未初始化.
- value:张量.必须具有与 ref 相同的类型.是要分配给变量的值.
- validate_shape:当为False的时候,ref和value的维度可以不相同。
变量恢复与存储
Saving A Model:
1 | import tensorflow as tf |
产生如下文件:
1 | checkpoint |
- tftcp.model.data-00000-of-00001:存储网络模型
- tftcp.model.meta:网络的图结构,存储了重建图所需的所有信息,但是不一定含有Variables。
- tftcp.model.index:连接上面的两个文件,从模型中读取到图节点对应的值。(is an indexing structure linking the first two things. It says “where in the data file do I find the parameters corresponding to this node?”)
- checkpoint:重建图的时候并不需要,只是在训练过程中存储了网络的多个模型,并跟踪最近的模型。
Loading a Model:
1 | import tensorflow as tf |
数据节点:placeholder
placeholder,翻译过来就是占位符。其实它类似于函数里的自变量。比如z = x + y,那么x和y就可以定义成占位符。占位符,顾名思义,就这是占一个位子,平时不用关心它们的值,当你做运算的时候,你再把你的数据灌进去就行了。是不是和自变量很像?看下面的代码:
1 | a = tf.placeholder(tf.float32, shape=[3]) # a是一个3维向量 |
输出结果是[6, 7, 8]。上面代码中出现了feed_dict的概念,其实就是用[1, 2, 3]代替a的意思。相当于在本轮计算中,自变量a的取值为[1, 2, 3]。其实不仅仅是tf.placeholder才可以用feed_dict,很多op都可以。只要tf.Graph.is_feedable(tensor)返回值是True,那么这个tensor就可用用feed_dict来灌入数据。
tf.constant()是直接定义在graph里的,它是graph的一部分,会随着graph一起加载。如果通过tf.constant()定义了一个维度很高的张量,那么graph占用的内存就会变大,加载也会变慢。而tf.placeholder就没有这个问题,所以如果数据维度很高的话,定义成tf.placeholder是更好的选择。
placeholder属性
- name:占位符操作在数据流图中的名称
- dtype:填充数据的类型
- shape:填充数据的形状
placeholder在图中的结构
下面对placeholder在graph中的结点表示进行说明。
1 | import tensorflow as tf |
在执行完placeholder(tf.float32, None)后,图中生成了一个结点:
- Placeholder
输出如下:可见关于Placeholder的所有信息都在其结点中表示出来了。虽然函数global_variables_initializer()的执行在图中添加了一个init的结点,但是没有任何操作。可见,Placeholder在会话中是不需要进行所谓初始化的。
1 | after_var_creation.graph |
总结
变量需要在session中执行初始化语句才能使用,而constant和placeholder不需要。
例如:
1 | import tensorflow as tf |
输出结果
1 | tf.global_variables_initializer(): init NoOp |
tf.global_variables_initializer()返回的是一个Op,所以有type属性,而tf.constant和tf.add返回的都是tensor,所以没有type属性。如果想查看constant和add等Operation的属性,需要使用tensorboard。不能直接打印出来。
然后,可以看出,tf.global_variables_initializer()返回的Op类型为NoOp,即不存在输入,也不存在输出。所有变量的初始化器通过控制依赖边与该NoOp相连,保证所有的全局变量被初始化。如下所示:
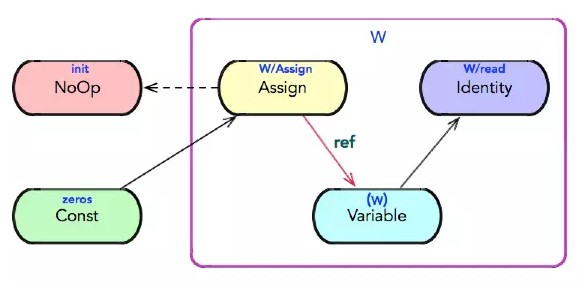
另外,从结果可以看出,无论是否有一个左值接受tf.global_variables_initializer()和tf.add()的结果,都不影响打印出来的结果。
从结果可以看出,对于计算节点,Operation的输入,输出都为张量。对于存储节点,需要使用tensor进行初始化,输出是变量,但是可以像张量那样使用。Just like any Tensor, variables created with Variable() can be used as inputs for other Ops in the graph。对于数据节点,可以在session.run()的时候使用numpy进行初始化,但是输出仍然是张量。
最后,可以看出如果对于Operation没有手动命名,tensorflow会自动命名,并且以Const:0和Const_1:0区分不同的变量,而手动命名若重复,也会以相同的规则重命名。
张量和计算图上的每一个节点所有代表的结果是对应的。张量的命名:node:src_output。其中node为节点的名称,src_output表示当前张量来自节点的第几个输出。即上述Const:0即该张量来自名字为Const节点的第0个输出。
对于tf.constant为操作(节点),在tensorflow的图中为一个节点。而由tf.constant得到的变量为tensor,在tensorflow的图中体现为边上的数据。
数据载体:张量(数据边)
对于tensorflow的数据边,绝大部分流动着张量。
控制边这里不讨论
张量是数据留图上的数据载体,但在物理实现上是一个句柄,他存储张量的元信息以及指向张量数据的内存缓冲区指针。
tensorflow张量除了支持常用的浮点数、整数、字符串、布尔型,还支持复数和量化整数类型。
张量的属性
- dtype:张量传输数据的类型
- name:张量在数据流图中的名称
- graph:张量所属的数据流图
- op:生成该张量的前置操作
- shape:张量传输数据的形状
- value_index:张量在该前置操作所有输出值中的索引
其中,name属性
- 张量的唯一标识符;
- 给出了张量是如何计算出来的。
计算图中的每一个节点都表示一个运算,而张量则将节点运算结果的属性保存下来。张量和计算图上的每一个节点所有代表的结果是对应的。张量的命名:node:src_output。其中node为节点的名称,src_output表示当前张量来自节点的第几个输出。如Const:0即该张量来自名字为Const节点的第0个输出。
创建
可以使用Tensor类构造方法,不过一般情况下不需要使用Tensor类,而是通过操作间接创建张量,典型的张量创建包括常量定义操作和代数计算操作。
例如:
1 | import tensorflow as tf |
输出为:
1 | [<tf.Tensor 'Const:0' shape=() dtype=float32>, |
求解
需要在会话中执行张量的eval方法或者会话的run方法。若不在会话中执行eval(),会报错。
1 | with tf.Session() as sess: |
输出结果为:
1 | 3.0 |
成员方法
- eval:取出张量值
- get_shape:获取张量的形状
- set_shape:修改张量的形状
- consumers:获取张量的后面操作
变量与张量的关系
变量可以通过read子节点得到张量,也可以使用assign节点将一个变量的张量赋值给另外一个节点的张量。
实例
1 | graph = tf.Graph() |
以上代码中定义了一个计算图,在该计算图中定义了一个常量。Tensorflow默认会创建一张计算图。所以上面代码中的前两行,可以省略。默认情况下,计算图是空的。

在执行完img = tf.constant(1.0, shape=[1,5,5,3])以后,计算图中生成了一个node,一个node结点由name, op, input, attrs组成,即结点名称、操作、输入以及一系列的属性(类型、形状、值)等组成,计算图就是由这样一个个的node组成的。对于tf.constant()函数,只会生成一个node,但对于有的函数,如tf.Variable(initializer, name)(注意其第一个参数是初始化器)就会生成多个node结点(后面会讲到)。
那么执行完img = tf.constant(1.0, shape=[1,5,5,3])后,计算图中就多一个node结点。(因为每个node的属性很多,我只表示name,op,input属性)

继续添加代码:
1 | img = tf.constant(1.0, shape=[1,5,5,3]) |
代码执行后的计算图如下:

需要注意的是,如果没有对结点进行命名,Tensorflow自动会将其命名为:Const、Const_1、const_2……。其他类型的结点类同。
现在,我们添加一个变量:
1 | img = tf.constant(1.0, shape=[1,5,5,3]) |
该变量用一个常量作为初始化器。我们先看一下计算图:

如图所示:
执行完tf.Variable()函数后,一共产生了三个结点:
- Variable:变量维护(不存放实际的值)
- Variable/Assign:变量分配
- Variable/read:变量使用
图中只是完成了操作的定义,但并没有执行操作(如Variable/Assign结点的Assign操作,所以,此时候变量依然不可以使用,这就是为什么要在会话中初始化的原因)。
我们继续添加代码:
1 | img = tf.constant(1.0, shape=[1,5,5,3]) |
得到的计算图如下:

可以看出,变量读取是通过Variable/read来进行的。
如果在这里我们直接开启会话,并执行计算图中的卷积操作,系统就会报错。
1 | img = tf.constant(1.0, shape=[1,5,5,3]) |
这段代码错误的原因在于,变量并没有初始化就被使用,而从图中清晰的可以看到,直接执行卷积,是回溯不到变量的值(Const_1)的(箭头方向)。
所以,在执行之前,要进行初始化,代码如下:
1 | img = tf.constant(1.0, shape=[1,5,5,3]) |
执行完tf.global_variables_initializer()函数以后,计算图如下:

tf.global_variables_initializer()产生了一个名为init的node,该结点将所有的Variable/Assign结点作为输入,将initial_value传入Assign子节点,以达到对整张计算图中的变量进行初始化。
所以,在开启会话后,执行的第一步操作,就是变量初始化(当然变量初始化的方式有很多种,我们也可以显示调用tf.assign()来完成对单个结点的初始化)。
完整代码如下:
1 | img = tf.constant(1.0, shape=[1,5,5,3]) |
tf.reset_default_graph()
如下是官网对tf.reset_default_graph()函数描述的翻译:tf.reset_default_graph函数用于清除默认图形堆栈并重置全局默认图形。
注意:默认图形是当前线程的一个属性。该tf.reset_default_graph函数只适用于当前线程。当一个tf.Session或者tf.InteractiveSession激活时调用这个函数会导致未定义的行为。调用此函数后使用任何以前创建的tf.Operation或tf.Tensor对象将导致未定义的行为。
demo1,无tf.reset_default_graph()函数:
1 | import tensorflow as tf |
执行结果:
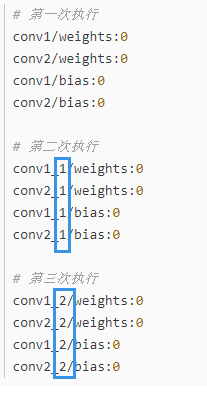
从上述结果可以看出,每次运行jupyter notebook时都会在上一次执行的基础生成新的张量。即:每在jupyter notebook上运行一次上述程序,就会在图上新增一个节点。
demo2,有tf.reset_default_graph()函数:
1 | import tensorflow as tf |
执行结果:
1 | # 第一次执行结果 |
无论执行多少次生成的张量始终不变。换句话说就是:tf.reset_default_graph函数用于清除默认图形堆栈并重置全局默认图形。
另外补充一个用法tf.get_default_graph().as_graph_def(): # Returns a serialized GraphDef representation of this graph。
1 | import tensorflow as tf |
执行结果为:
1 | node { |
Operation与Tensor
Operation是图中的节点,Tensor是节点之间的连接。一般来说,Operation的输入和输出均是Tensor。
1 | checkpoint_path = 'checkpoints/trigger_model_all' |
另外,output1.op等价于graph.get_operation_by_name('final_op'),说明output1.op可以得到是哪个Operation得到的该Tensor。而graph.get_operation_by_name('final_op').outputs[0]可以得到Operation的第一个输出Tensor。
会话
初始化
tf.Session接受三个可选参数:
- target。 如果将此参数留空(默认设置),会话将仅使用本地机器中的设备。但是,您也可以指定 grpc:// 网址,以便指定 TensorFlow 服务器的地址,这使得会话可以访问该服务器控制的机器上的所有设备。请参阅 tf.train.Server 以详细了解如何创建 TensorFlow 服务器。例如,在常见的图间复制配置中,tf.Session 连接到 tf.train.Server 的流程与客户端相同。分布式 TensorFlow 部署指南介绍了其他常见情形。
- graph。 默认情况下,新的 tf.Session 将绑定到当前的默认图,并且仅能够在当前的默认图中运行操作。如果您在程序中使用了多个图(更多详情请参阅使用多个图进行编程),则可以在构建会话时指定明确的 tf.Graph。
- config。 此参数允许您指定一个控制会话行为的 tf.ConfigProto。例如,部分配置选项包括:
- allow_soft_placement。将此参数设置为 True 可启用“软”设备放置算法,该算法会忽略尝试将仅限 CPU 的操作分配到 GPU 设备上的 tf.device 注解,并将这些操作放置到 CPU 上。
- cluster_def。使用分布式 TensorFlow 时,此选项允许您指定要在计算中使用的机器,并提供作业名称、任务索引和网络地址之间的映射。详情请参阅 tf.train.ClusterSpec.as_cluster_def。
- graph_options.optimizer_options。在执行图之前使您能够控制 TensorFlow 对图实施的优化。
- gpu_options.allow_growth。将此参数设置为 True 可更改 GPU 内存分配器,使该分配器逐渐增加分配的内存量,而不是在启动时分配掉大多数内存。
run
run简介
会话构造时已经绑定了数据流图,在run()中传入待求解的张量和待填充的数据即可。
tf.Session().run()函数的定义:
1 | run( |
tf.Session().run()函数的功能为:执行fetches参数所提供的operation操作或计算其所提供的Tensor。
run()函数每执行一步,都会执行与fetches有关的图中的所有结点的计算,以完成fetches中的任务。其中,feed_dict提供了部分数据输入的功能。(和tf.Placeholder()搭配使用,很舒服)
参数说明:
- fetches:可以是张量,此时候返回值与fetches格式一致;该参数还可以是一个操作,因为操作的输出本质也是张量。
- feed_dict:字典格式。给模型输入其计算过程中所需要的值。
如上说明,一个session()中包含了Operation被执行,以及Tensor被evaluated的环境。即可以在会话中执行Op,也可以计算Tensor。您可以将一个或多个 tf.Operation 或 tf.Tensor 对象传递到 tf.Session.run,TensorFlow 将执行计算结果所需的操作。
例如:
1 | import tensorflow as tf |
输出结果为:
1 | 3.0 |
tf.Session.run要求您指定一组 fetch,这些 fetch 可确定返回值,并且可能是 tf.Operation、tf.Tensor或类张量类型,例如 tf.Variable。这些 fetch 决定了必须执行哪些子图(属于整体 tf.Graph)以生成结果:该子图包含 fetch 列表中指定的所有操作,以及其输出用于计算 fetch 值的所有操作。例如,以下代码段说明了 tf.Session.run 的不同参数如何导致执行不同的子图:
1 | x = tf.constant([[37.0, -23.0], [1.0, 4.0]]) |
tf.Session.run 也可以选择接受 feed 字典,该字典是从 tf.Tensor 对象(通常是 tf.placeholder 张量)到在执行时会替换这些张量的值(通常是 Python 标量、列表或 NumPy 数组)的映射。例如:
1 | # Define a placeholder that expects a vector of three floating-point values, |
run深入
当我们编写tensorflow代码时, 总是定义好整个计算图,然后才调用sess.run()去执行整个定义好的计算图, 那么有几个问题:
- 什么会添加到tensorflow的图中。
- 当执行sess.sun()的时候, 程序是否执行了计算图上的所有节点呢?
- sees.run()中的fetch, 为了取回(Fetch)操作的输出内容, 我们在sess.run()里面传入tensor, 那这些tensor的先后顺序会影响最后的结果嘛?比如有些tensor是有先后执行关系的,如果置于后面,会重复计算嘛?
- 在同一个sess中,使用sess.run()运行同一个节点,得到的结果相同么?
对于第一个问题:若程序中没有声明图,tensorflow使用默认图。那么所有使用tf的节点均会添加到tensorflow图中,而numpy函数、print函数(Python内置类型的加减乘法除外)都不会被添加到图中,也就不会在sess.run()函数中执行。
实验一:
1 | import numpy as np |
报错:
1 | ValueError: cannot reshape array of size 1 into shape (12,50) |
可以看到,虽然在sess.run()中确实运行了numpy方法(尴尬,与理论不符合啊)。但是报错了,我们简单粗暴的理解为numpy没有在图中,不能进行就行了(手动滑稽)。
对于Python内置类型,可以直接使用。
实验二:
1 | import tensorflow as tf |
运行结果
1 | [array([[1., 1.], |
总结:在tensorflow图中,尽量全部使用tensorflow的函数(如果可能也尽量不用Python的内置类型做运算),不要使用numpy等Python库的函数(可以解释print函数为什么在sess.run()的时候不能运行)。若在运行过程中需要更改的,使用tensorflow变量(根据需要声明是否需要可训练),对于输入量,使用占位符。
对于第二个问题,只有fetch里的图元素, 才会被执行, 不在fetch中的图节点是不会执行的
实验三:
1 | import tensorflow as tf |
对于windows平台上tensorflow1.8程序输出的结果(可能)为:
1 | [1.0, 1.0, 1.0] |
但是,对于Ubuntu平台tensorflow1.8程序输出的结果(可能)为
1 | [1.0, 0.0, 1.0] |
若将sess.run(init)放到了for循环里面
windows平台上tensorflow1.8程序运行结果(可能)如下:
1 | [1.0, 1.0, 1.0] |
但是,对于Ubuntu平台tensorflow1.8程序输出的结果(可能)为
1 | [1.0, 0.0, 1.0] |
分析:出现不同结果的原因我们将会在探索第三个问题的时候给出。但是对于我们这里的第二个问题,可以看到不管在哪个平台上update2节点都不会运行。
总结:对于sess.sun(fetch), 只有fetch里的图元素, 才会被执行, 不在fetch中的图节点是不会执行的。若在图中使用了numpy等Python库函数(如print),在sess.run()是不会执行的。
对于第三个问题,当sess.run() 里面的fetch是一个list时, 无论是update在前, 还是state在前, 不会执行update之后看到state在update后面就再执行一次state, 都是在这个list中的节点在流程图中全部执行完之后在取值的。 当我们将sess.run()里面的fetch列表中的节点打乱时, 取出来的值依然是一次流程图计算出来的结果。
实验四:
1 | import tensorflow as tf |
结果可能为:
1 | [10001.0, 10001.0, 10001.0, 10001.0] |
分析:在不同平台上,相同版本的tensorflow运行就结果可能不同。甚至同一个环境运行多次的结果也不近相同,出现了这个问题的原因主要在于:TensorFlow是属于符号式编程的,它不会直接运行定义了的操作,而是在计算图中创造一个相关的节点,这个节点可以用Session.run()进行执行。这个使得TF可以在优化过程中(do optimization)决定优化的顺序(the optimal order),并且在运算中剔除一些不需要使用的节点,而这一切都发生在运行中(run time)。如果你只是在计算图中使用tf.Tensors,你就不需要担心依赖问题(dependencies),但是你更可能会使用tf.Variable(),这个操作使得问题变得更加困难。你应该也注意到了,你在代码中定义操作(ops)的顺序是不会影响到在TF运行时的执行顺序的,唯一会影响到执行顺序的是控制依赖。控制依赖对于张量来说是直接的。每一次你在操作中使用一个张量时,操作将会定义一个对于这个张量来说的隐式的依赖。但是如果你同时也使用了变量,事情就变得更糟糕了,因为变量可以取很多值。当处理这些变量时,你可能需要显式地去通过使用tf.control_dependencies()去控制依赖。
对于第四个问题:每次sess.run()都会执行一次图,所以在训练过程尽量一次在sess.run()取出所有要得到的值,否则运算量很大。而且,也有可能出现一些意想不到的错误(例如,tensorflow训练过程中若执行了两次sess.run()可能执行了两次取batchsize数据的操作,使得一次训练过程中数据加载两次)。
tf.control_dependencies
该函数保证其辖域中的操作必须要在该函数所传递的参数中的操作完成后再进行。请看下面一个例子。
1 | import tensorflow as tf |
解释:对于add节点,在sess.run()的时候并没有执行update_op节点。而在执行add_with_dependencies节点的时候,使用了with tf.control_dependencies函数使得先执行update_op节点更新a_2节点,然后执行add_with_dependencies节点。
可以传入None 来消除依赖:
1 | with g.control_dependencies([a, b]): |
注意:控制依赖只对那些在上下文环境中建立的操作有效,仅仅在context中使用一个操作或张量是没用的
1 | # WRONG |
总结:tf.control_dependencies函数有两个常用的场景:
- 使用
tf.assign更新了变量,而该变量要在之后使用到。 - tensorflow的
batch_norm函数中。
关闭会话
- 使用sess.close()显式关闭会话
- 使用with语句定义sess时候,会隐式关闭会话
1
2
3with tf.Session() as sess:
sess.run()
# Session.__exit__ 被隐式调用。进而调用Session.close
如果程序结束时没有关闭会话,可能会出现错误:terminate called without an active exception。
Graph、GraphDef、MetaGraph
一下内容来源于Tensorflow框架实现中的“三”种图。
Graph
首先介绍一下关于 Tensorflow 中 Graph 和它的序列化表示 Graph_def。在Tensorflow的官方文档中,Graph 被定义为“一些 Operation 和 Tensor 的集合”。例如我们表达如下的一个计算的 python代码,
1 | a = tf.placeholder(tf.float32) |
就会生成相应的一张图,在Tensorboard中看到的图大概如下这样。其中每一个圆圈表示一个Operation(输入处为Placeholder),椭圆到椭圆的边为Tensor,箭头的指向表示了这张图Operation 输入输出 Tensor 的传递关系。
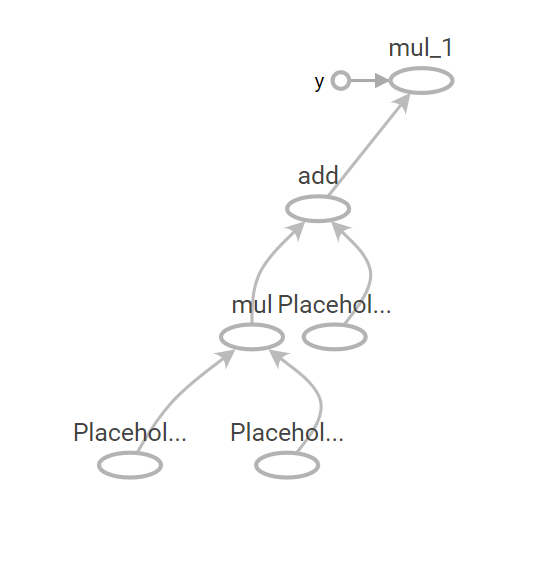
这张图所表达的数据流 与 python 代码中所表达的计算是对应的关系(为了称呼方便,我们下面将这张由Python表达式所描述的数据流动关系叫做 Python Graph)。然而在真实的 Tensorflow 运行中,Python 构建的“图”并不是启动一个Session之后始终不变的东西。因为Tensorflow在运行时,真实的计算会被下放到多CPU上,或者 GPU 等异构设备,或者ARM等上进行高性能/能效的计算。单纯使用 Python 肯定是无法有效完成的。实际上,Tensorflow而是首先将 python 代码所描绘的图转换(即“序列化”)成 Protocol Buffer,再通过 C/C++/CUDA 运行 Protocol Buffer 所定义的图。(Protocol Buffer的介绍可以参考这篇文章学习:https://www.ibm.com/developerworks/cn/linux/l-cn-gpb/)
GraphDef
从 python Graph中序列化出来的图就叫做 GraphDef(这是一种不严格的说法,先这样进行理解)。而GraphDef 类是由 ProtoBuf 库根据 tensorflow/core/framework/graph.proto 定义创建的对象。GraphDef 又是由许多叫做 NodeDef 的 Protocol Buffer 组成。在概念上 NodeDef 与 (Python Graph 中的)Operation 相对应。如下就是 GraphDef 的 ProtoBuf,由许多node组成的图表示。这是与上文 Python 图对应的 GraphDef:
1 | node { |
以上三个 NodeDef 定义了两个Placeholder和一个Multiply。Placeholder 通过 attr(attribute的缩写)来定义数据类型和 Tensor 的形状。Multiply通过 input 属性定义了两个placeholder作为其输入。无论是 Placeholder 还是 Multiply 都没有关于输出(output)的信息。其实 Tensorflow 中都是通过 Input 来定义 Node 之间的连接信息。
那么既然 tf.Operation 的序列化 ProtoBuf 是 NodeDef,那么 tf.Variable 呢?在这个 GraphDef 中只有网络的连接信息,却没有任何 Variables呀?没错,Graphdef中不保存任何 Variable 的信息,所以如果我们从 graph_def 来构建图并恢复训练的话,是不能成功的。比如以下代码,
1 | with tf.Graph().as_default() as graph: |
其中 tf.trainable_variables() 只会返回一个空的list。Tf.train.Saver() 也会报告 no variables to save。
然而,在实际线上 inference 中,通常就是使用 GraphDef。然而,GraphDef中连Variable都没有,怎么存储weight呢?原来GraphDef 虽然不能保存 Variable,但可以保存 Constant 。通过 tf.constant 将 weight 直接存储在 NodeDef 里,tensorflow 1.3.0 版本也提供了一套叫做 freeze_graph 的工具来自动的将图中的 Variable 替换成 constant 存储在 GraphDef 里面,并将该图导出为 Proto。可以查看以下链接获取更多信息,
https://www.tensorflow.org/extend/tool_developers/
https://www.tensorflow.org/mobile/prepare_models
tf.train.write_graph()/tf.Import_graph_def() 就是用来进行 GraphDef 读写的API。那么,我们怎么才能从序列化的图中,得到 Variables呢?这就要学习下一个重要概念,MetaGraph。
另外函数tf.get_default_graph().as_graph_def(): # Returns a serialized
GraphDefrepresentation of this graph。
MetaGraph
Meta graph 的官方解释是:一个Meta Graph 由一个计算图和其相关的元数据构成。其包含了用于继续训练,实施评估和(在已训练好的的图上)做前向推断的信息。(A MetaGraph consists of both a computational graph and its associated metadata. A MetaGraph contains the information required to continue training, perform evaluation, or run inference on a previously trained graph. From https://www.tensorflow.org/versions/r1.1/programmers_guide/。
这一段看的云里雾里,不过这篇文章(https://www.tensorflow.org/versions/r1.1/programmers_guide/meta_graph)进一步解释说,Meta Graph在具体实现上就是一个MetaGraphDef (同样是由 Protocol Buffer来定义的)。其包含了四种主要的信息,根据Tensorflow官网,这四种 Protobuf 分别是:
- MetaInfoDef,存一些元信息(比如版本和其他用户信息)
- GraphDef, MetaGraph的核心内容之一,上一小节介绍过
- SaverDef,图的Saver信息(比如最多同时保存的checkpoint数量,需保存的Tensor名字等,但并不保存Tensor中的实际内容)
- CollectionDef 任何需要特殊注意的 Python 对象,需要特殊的标注以方便import_meta_graph 后取回。(比如“train_op”,”prediction”
等等)
在以上四种 ProtoBuf 里面,1 和 3 都比较容易理解,2 刚刚总结过。这里特别要讲一下 Collection(CollectionDef是对应的ProtoBuf)。
Tensorflow中并没有一个官方的定义说 collection 是什么。简单的理解,它就是为了方别用户对图中的操作和变量进行管理,而创建的一个概念。它可以说是一种“集合”,通过一个 key(string类型)来对一组 Python 对象进行命名的集合。这个key既可以是tensorflow在内部定义的一些key,也可以是用户自己定义的名字(string)。
Tensorflow 内部定义了许多标准 Key,全部定义在了 tf.GraphKeys 这个类中。其中有一些常用的,tf.GraphKeys.TRAINABLE_VARIABLES,tf.GraphKeys.GLOBAL_VARIABLES 等等。tf.trainable_variables() 与 tf.get_collection(tf.GraphKeys.TRAINABLE_VARIABLES) 是等价的;tf.global_variables() 与 tf.get_collection(tf.GraphKeys.GLOBAL_VARIABLES) 是等价的。
对于用户定义的 key,我们举一个例子。例如:
1 | pred = model_network(X) |
这样一段 Tensorflow程序,用户希望特别关注 pred, loss train_op 这几个操作,那么就可以使用如下代码,将这几个变量加入到 collection 中去。(假设我们将其命名为 “training_collection”)
1 | tf.add_to_collection("training_collection", pred) |
并且可以通过 Train_collect = tf.get_collection(“training_collection”) 得到一个python list,其中的内容就是 pred, loss, train_op的 Tensor。这通常是为了在一个新的 session 中打开这张图时,方便我们获取想要的操作。比如我们可以直接工通过get_collection() 得到 train_op,然后通过 sess.run(train_op)来开启一段训练,而无需重新构建 loss 和optimizer。
通过export_meta_graph保存图,并且通过 add_to_collection 将 train_op 加入到 collection中:
1 | with tf.Session() as sess: |
通过 import_meta_graph将图恢复(同时初始化为本 Session的 default 图),并且通过 get_collection 重新获得 train_op,以及通过 train_op 来开始一段训练( sess.run() )。
1 | with tf.Session() as new_sess: |
更多的代码例子可以在这篇文档(https://www.tensorflow.org/api_guides/python/meta_graph)中的 Import a MetaGraph 章节中看到。
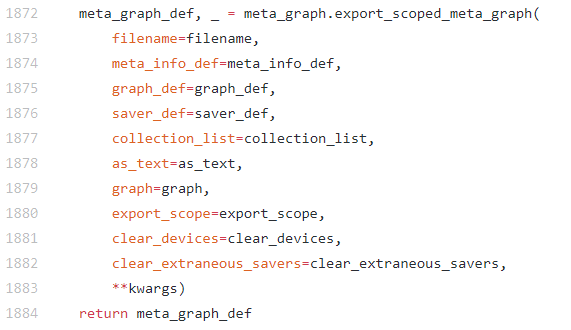
那么,从 Meta Graph 中恢复构建的图可以被训练吗?是可以的。Tensorflow的官方文档 https://www.tensorflow.org/api_guides/python/meta_graph 说明了使用方法。这里要特殊的说明一下,Meta Graph中虽然包含Variable的信息,却没有 Variable 的实际值。所以从Meta Graph中恢复的图,其训练是从随机初始化的值开始的。训练中Variable的实际值都保存在check-point中,如果要从之前训练的状态继续恢复训练,就要从checkpoint中restore。进一步读一下Export Meta Graph的代码,可以看到,事实上variables并没有被export到meta_graph 中。
https://github.com/tensorflow/tensorflow/blob/r1.4/tensorflow/python/training/saver.py (1872行)
https://github.com/tensorflow/tensorflow/blob/r1.4/tensorflow/python/framework/meta_graph.py (829,845行)
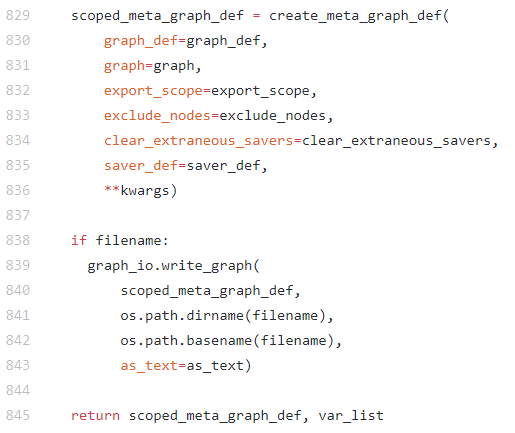
export_meta_graph/Import_meta_graph 就是用来进行 Meta Graph 读写的API。tf.train.saver.save() 在保存checkpoint的同时也会保存Meta Graph。但是在恢复图时,tf.train.saver.restore() 只恢复 Variable,如果要从MetaGraph恢复图,需要使用 import_meta_graph。这是其实为了方便用户,有时我们不需要从MetaGraph恢复的图,而是需要在 python 中构建神经网络图,并恢复对应的 Variable。
最后补充几个常用方法:
1 | # 默认图的所有节点名称 |
总结
简而言之,Tensorflow 在前端 Python 中构建图,并且通过将该图序列化到 ProtoBuf GraphDef,以方便在后端运行。在这个过程中,图的保存、恢复和运行都通过 ProtoBuf 来实现。GraphDef,MetaGraph,以及Variable,Collection 和 Saver 等都有对应的 ProtoBuf 定义。ProtoBuf 的定义也决定了用户能对图进行的操作。例如用户只能找到Node的前一个Node,却无法得知自己的输出会由哪个Node接收。
GraphKeys
tf.GraphKeys包含所有graph collection中的标准集合名,有点像Python里的build-in fuction。
首先要了解graph collection是什么。
graph collection
在官方教程——图和会话中,介绍什么是tf.Graph是这么说的:
tf.Graph包含两类相关信息:
- 图结构。图的节点和边缘,指明了各个指令组合在一起的方式,但不规定它们的使用方式。图结构与汇编代码类似:检查图结构可以传达一些有用的信息,但它不包含源代码传达的的所有有用上下文。
- 图集合。TensorFlow提供了一种通用机制,以便在
tf.Graph中存储元数据集合。tf.add_to_collection函数允许您将对象列表与一个键相关联(其中tf.GraphKeys定义了部分标准键),tf.get_collection则允许您查询与键关联的所有对象。TensorFlow库的许多组成部分会使用它:例如,当您创建tf.Variable时,系统会默认将其添加到表示“全局变量(tf.global_variables)”和“可训练变量tf.trainable_variables)”的集合中。当您后续创建tf.train.Saver或tf.train.Optimizer时,这些集合中的变量将用作默认参数。
也就是说,在创建图的过程中,TensorFlow的Python底层会自动用一些collection对op进行归类,方便之后的调用。这部分collection的名字被称为tf.GraphKeys,可以用来获取不同类型的op。当然,我们也可以自定义collection来收集op。
常见GraphKeys
- GLOBAL_VARIABLES: 该collection默认加入所有的
Variable对象,并且在分布式环境中共享。一般来说,TRAINABLE_VARIABLES包含在MODEL_VARIABLES中,MODEL_VARIABLES包含在GLOBAL_VARIABLES中。比如学习率、BN中的μ和σ或者计步器这些变量不需要训练的变量,trainable设置为False,这时TRAINABLE_VARIABLES就不会包含这些变量,但是GLOBAL_VARIABLES会包含。 - LOCAL_VARIABLES: 与
GLOBAL_VARIABLES不同的是,它只包含本机器上的Variable,即不能在分布式环境中共享。 - MODEL_VARIABLES: 顾名思义,模型中的变量,在构建模型中,所有用于正向传递的
Variable都将添加到这里。 - TRAINALBEL_VARIABLES: 所有用于反向传递的
Variable,即可训练(可以被optimizer优化,进行参数更新)的变量。 - SUMMARIES: 跟Tensorboard相关,这里的
Variable都由tf.summary建立并将用于可视化。 - QUEUE_RUNNERS: the
QueueRunnerobjects that are used to produce input for a computation. - MOVING_AVERAGE_VARIABLES: the subset of
Variableobjects that will also keep moving averages. - REGULARIZATION_LOSSES: regularization losses collected during graph construction.
另外,值得注意的是tf.trainable_variables() 与 tf.get_collection(tf.GraphKeys.TRAINABLE_VARIABLES) 是等价的;tf.global_variables() 与 tf.get_collection(tf.GraphKeys.GLOBAL_VARIABLES) 是等价的。
在TensorFlow中也定义了下面几个GraphKeys,但是它们not automatically populated。
- WEIGHTS
- BIASES
- ACTIVATIONS
总结
tensorflow的图由节点和边组成,而图只是模型的整体框架,类似于人的各个结构。而session则是负责将tensorflow图的边流动起来,类似于人的血夜。而tensorflow的边分为控制边和数据边,对于控制边,需要在session.run()中传入节点(例如变量需要在session.run中执行tf.global_variables_initializer()初始化后才能使用),而对于数据边,需要在session.run()中传入tensor。
参考
Tensorflow中constant、Varibles、placeholder在graph中的结点表示
Tensorflow中的图(tf.Graph)和会话(tf.Session)
Variables in Tensorflow
TensorFlow学习笔记1:graph、session和op
TensorFlow 指南
简介
变量
张量
图和会话
一文滤清 TensorFlow
tensorflow学习—sess.run()
tf.control_dependencies()作用及用法
tensorflow中的batch_norm以及tf.control_dependencies和tf.GraphKeys.UPDATE_OPS的探究
【tensorflow】打印Tensorflow graph中的所有需要训练的变量—tf.trainable_variables()
Effective TensorFlow Chapter 7: TensorFlow中的执行顺序和控制依赖
【TensorFlow】tf.reset_default_graph()函数
Tensorflow使用技巧:通过graph.as_graph_def探索函数内部机制
Tensorflow框架实现中的“三”种图
Tensorflow小技巧整理:tf.trainable_variables(), tf.all_variables(), tf.global_variables()的使用

